Thank you for joining. Lets start
Here, I am considering that everyone has gone through APNs(Apple Push Notification service). If not then first go through this link.
If not, you can go through this links and follow the steps given by FCM in your app:
What does a Payload contains?
There are Apple defined keys of which you can use in your JSON Payload Dictionary according to your need.
I will discuss here 2 keys which we will be needing further.
Now consider that FirstViewController is our root view controller. Now when FCM sends push notification and on opening the received notification user needs to be -
So we have to consider two case:
1. If your app is in the foreground state or background state.
If the push notification is not silenced and user taps on push notification the following function gets called from app delegate.
For opening a particular view controller we need to check for category configured in payload of push notification.
So to achieve this we will add below code to above function
In above function we have checked the categoryIdentifier of response and accordingly acted. So we have to post a notification with a unique name you want and pass the userInfo if needed.
Here, we have consider that app will launch as usual and then open a particular view controller after the default view controller and not directly open a particular view controller. You may ask why? So that when user taps on Back button on navigation bar of the particular view controller it should land on default view controller again. See the image below for understanding.
Now for moving user to particular view controller we have to add a observer to check the notification in FirstViewController which is the default view controller. We need to add the following code in viewDidLoad method.
And also need two add the Notification observer function for adding actions to be executed with the same name used in Observer in FirstViewController.
So whenever a notification is opened when app is in foreground or background the above will execute and move to respective view controller according to category in payload.
2. If your app is in inactive state -
This is the case where app is not opened or is terminated. So whenever the push notification arrives and user taps on push notification the first method which gets called is
So we have to check in this function whether the app is launched by opening push notification or by clicking app icon. For this there is a provision provided to us. The function will look as follows after adding the required code.
Now will think what is that AppConstants. So before adding above code I have created one swift class named AppConstants to add the UserDefaults and declare the keys as follows:
So here I have defined two keys for two notification types which will store bool value. True if app is launched by opening push notification else by default it will be False.
So in above function in didFinishLaunching we are checking the app launched by user tapping on push notification or not. If yes then we check for the category of push notification and accordingly set the true value for keys in UserDefaults.
Further when app is launched first the main view will open so in FirstViewController we have to check in viewDidLoad, whether these UserDefaults value are true or false. And on that basis take action of pushing to respective view controller as follows:
Here in FirstViewControllers viewDidLoad method we have checked the bool value for those keys of user defaults and accordingly push to the particular view controller and set the bool value to false again. So now whenever a new notification arrives while app is in inactive state and user taps on push notification the above process takes place and user is moved to particular view controller.
Thats it for the topic. I hope you have got everything. Feel free to comment if I am wrong.
Thank you!!!otification arrives while app is in inactive state and user taps on push notification the above process takes place and user is moved to particular view controller.
Thats it for the topic. I hope you have got everything. Feel free to comment if I am wrong.
Thank you!!!
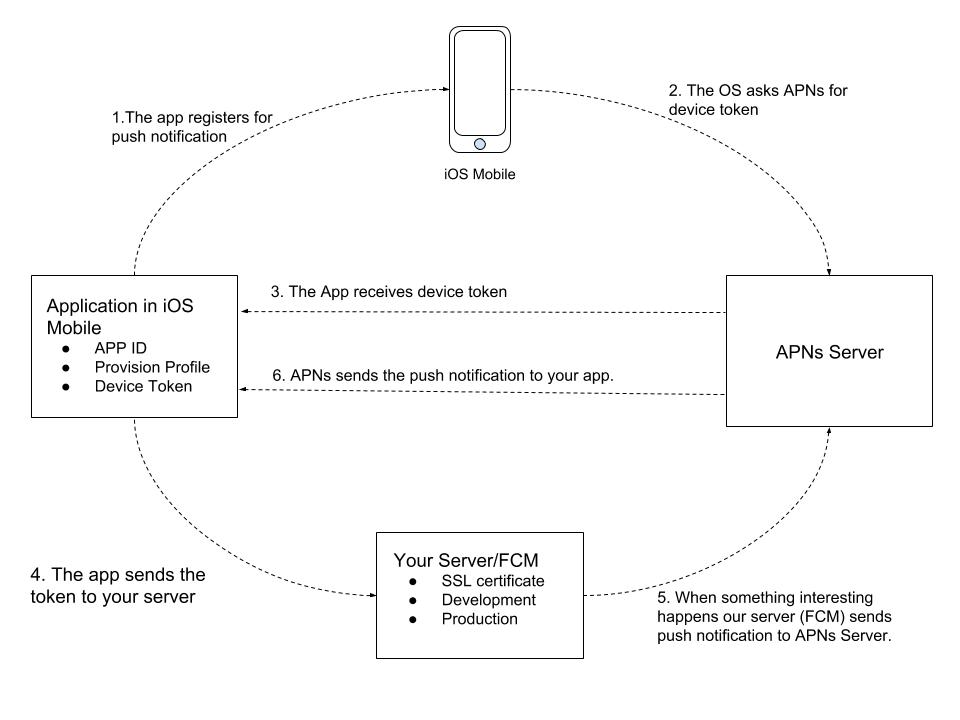
First of all we will go through the Push notification flow
 |
| Push Notification Flow |
Here, I am considering that everyone has gone through APNs(Apple Push Notification service). If not then first go through this link.
How the push notification flow takes place?
Above image will help you understand the flow easily which is as follows:- Your app registers for Push notification service.
- The device in which app is running will request for device token from APNs server along with device certificate. APNs will validate the certificates of application and generate a app-specific device token.
- APNS will send the device token to the application.
- This device token is then send to your/FCM server which will be providing notification.
- So whenever any interesting thing happens, your/FCM server sends push notification request along with device token to APNs.
- APNs decrypts the token to ensure the validity of the request and to determine the target device and sends the Push notification to your app.
Now for receiving push notification here we will consider FCM is integrated and FCM will be sending push notification to APNs.
I consider here that you have gone through the procedure to configure FCM and has followed the steps given by FCM for push notification integration in iOS App to receive the push notification.If not, you can go through this links and follow the steps given by FCM in your app:
- To configure Firebase
- To send notifications to users with Cloud Messaging.
 import UIKit
 import Firebase
 import UserNotifications
 @UIApplicationMain
  class AppDelegate: UIResponder, UIApplicationDelegate{
   var window: UIWindow?
   let gcmMessageIDKey = "gcm.message_id"
   func application(_ application: UIApplication, didFinishLaunchingWithOptions launchOptions: [UIApplication.LaunchOptionsKey: Any]?) -> Bool {
    FirebaseApp.configure()
    if #available(iOS 10.0, *) {
     // For iOS 10 display notification (sent via APNS)
     UNUserNotificationCenter.current().delegate = self
     let authOptions: UNAuthorizationOptions = [.alert, .badge, .sound]
     UNUserNotificationCenter.current().requestAuthorization(
      options: authOptions,
      completionHandler: {_, _ in })
    } else {
     let settings: UIUserNotificationSettings =
      UIUserNotificationSettings(types: [.alert, .badge, .sound], categories: nil)
     application.registerUserNotificationSettings(settings)
    }
    // Register the notification categories.
    application.registerForRemoteNotifications()
    Messaging.messaging().delegate = self
    return true
   }
   func applicationWillResignActive(_ application: UIApplication) {
    // Sent when the application is about to move from active to inactive state. This can occur for certain types of temporary interruptions (such as an incoming phone call or SMS message) or when the user quits the application and it begins the transition to the background state.
    // Use this method to pause ongoing tasks, disable timers, and invalidate graphics rendering callbacks. Games should use this method to pause the game.
   }
   func applicationDidEnterBackground(_ application: UIApplication) {
    // Use this method to release shared resources, save user data, invalidate timers, and store enough application state information to restore your application to its current state in case it is terminated later.
    // If your application supports background execution, this method is called instead of applicationWillTerminate: when the user quits.
   }
   func applicationWillEnterForeground(_ application: UIApplication) {
    // Called as part of the transition from the background to the active state; here you can undo many of the changes made on entering the background.
   }
   func applicationDidBecomeActive(_ application: UIApplication) {
    // Restart any tasks that were paused (or not yet started) while the application was inactive. If the application was previously in the background, optionally refresh the user interface.
   }
   func applicationWillTerminate(_ application: UIApplication) {
    // Called when the application is about to terminate. Save data if appropriate. See also applicationDidEnterBackground:.
   }
   // MARK :- Delegate methods of UserNotification
   func application(_ application: UIApplication, didFailToRegisterForRemoteNotificationsWithError error: Error) {
    print("Unable to register for remote notifications: \(error.localizedDescription)")
   }
   func application(_ application: UIApplication, didReceiveRemoteNotification userInfo: [AnyHashable : Any], fetchCompletionHandler completionHandler: @escaping (UIBackgroundFetchResult) -> Void) {
    if let messageID = userInfo[gcmMessageIDKey] {
     print("Message ID: \(messageID)")
    }
    // Print full message.
    print(userInfo)
    completionHandler(UIBackgroundFetchResult.newData)
   }
   func application(_ application: UIApplication, didRegisterForRemoteNotificationsWithDeviceToken deviceToken: Data) {
    Messaging.messaging().apnsToken = deviceToken
    print("APNs token retrieved: \(deviceToken)")
   }
  }
  extension AppDelegate : UNUserNotificationCenterDelegate
  {
   func userNotificationCenter(_ center: UNUserNotificationCenter, willPresent notification: UNNotification, withCompletionHandler completionHandler: @escaping (UNNotificationPresentationOptions) -> Void) {
    let userInfo = notification.request.content.userInfo
    // With swizzling disabled you must let Messaging know about the message, for Analytics
    // Messaging.messaging().appDidReceiveMessage(userInfo)
    // Print message ID.
    if let messageID = userInfo[gcmMessageIDKey] {
     print("Message ID: \(messageID)")
    }
    // Print full message.
    print(userInfo)
    // Change this to your preferred presentation option
    completionHandler([.alert, .badge, .sound])
   }
   func userNotificationCenter(_ center: UNUserNotificationCenter, didReceive response: UNNotificationResponse, withCompletionHandler completionHandler: @escaping () -> Void) {
    let userInfo = response.notification.request.content.userInfo
    // Print message ID.
    if let messageID = userInfo[gcmMessageIDKey] {
     print("Message ID: \(messageID)")
    }
    // Print full message.
    print(userInfo)
    completionHandler()
   }
  }
  extension AppDelegate : MessagingDelegate
  {
   func messaging(_ messaging: Messaging, didReceiveRegistrationToken fcmToken: String) {
    let dataDict:[String: String] = ["token": fcmToken]
    NotificationCenter.default.post(name: Notification.Name("FCMToken"), object: nil, userInfo: dataDict)
     print("Firebase registration token: \(fcmToken)")
    // TODO: If necessary send token to application server.
    // Note: This callback is fired at each app startup and whenever a new token is generated.
   }
  }
Before moving further let me explain Push Notification Payload.
What is Payload?
When your server sends the push notification to APNs server, it includes the payload. Payload is just a custom data which you want to send to app along with information about how the system should notify the user (silently, with sound etc). The payload is in JSON format and send as a body content. The size of the payload depends of type of notification you are sending- If you are sending regular remote notification then the maximum size is 4KB.
- If you ares sending Voice over Internet Protocol (VoIP) notifications then the maximum size is 5KB.
What does a Payload contains?
There are Apple defined keys of which you can use in your JSON Payload Dictionary according to your need.
I will discuss here 2 keys which we will be needing further.
- alert : It is a dictionary of again some Apple defined keys. This contains the information to be shown in notification like title, subtitle, image.
- category : It is a string and is the notification type. And it must be one of the identifier of UNNotificationCategory object you declare at launch time. We will be using this to take action on opening push notification. Category is also used for actions on Push notification but we will learn it later.
So come lets focus on our task. We want that if user opens a push notification, a particular view controller should open.
For this let us consider an app having three view controllers. Their names are FirstViewController, SecondViewController and ThirdViewController.Now consider that FirstViewController is our root view controller. Now when FCM sends push notification and on opening the received notification user needs to be -
- pushed to 'SecondViewController' when 'category' is 'Second'
- pushed to 'ThirdViewController' when 'category' is 'Third'
So we have to consider two case:
1. If your app is in the foreground state or background state.
If the push notification is not silenced and user taps on push notification the following function gets called from app delegate.
 func userNotificationCenter(_ center: UNUserNotificationCenter, didReceive response: UNNotificationResponse, withCompletionHandler completionHandler: @escaping () -> Void) {
     completionHandler()
   }
For opening a particular view controller we need to check for category configured in payload of push notification.
So to achieve this we will add below code to above function
 let userInfo = response.notification.request.content.userInfo
 let title = response.notification.request.content.title
 switch response.notification.request.content.categoryIdentifier
   {
    case "Second":
     NotificationCenter.default.post(name: NSNotification.Name(rawValue: "SecondTypeNotification"), object: title, userInfo: userInfo)
       break
    case "Third":
     NotificationCenter.default.post(name: NSNotification.Name(rawValue: "ThirdTypeNotification"), object: title, userInfo: userInfo)
       break
    default:
     break
} func userNotificationCenter(_ center: UNUserNotificationCenter, didReceive response: UNNotificationResponse, withCompletionHandler completionHandler: @escaping () -> Void) {
let userInfo = response.notification.request.content.userInfo
let title = response.notification.request.content.title
switch response.notification.request.content.categoryIdentifier
{
case "Second":
NotificationCenter.default.post(name: NSNotification.Name(rawValue: "SecondTypeNotification"), object: title, userInfo: userInfo)
break
case "Third":
NotificationCenter.default.post(name: NSNotification.Name(rawValue: "ThirdTypeNotification"), object: title, userInfo: userInfo)
break
default:
break
}
completionHandler()
}
In above function we have checked the categoryIdentifier of response and accordingly acted. So we have to post a notification with a unique name you want and pass the userInfo if needed.
Here, we have consider that app will launch as usual and then open a particular view controller after the default view controller and not directly open a particular view controller. You may ask why? So that when user taps on Back button on navigation bar of the particular view controller it should land on default view controller again. See the image below for understanding.
Now for moving user to particular view controller we have to add a observer to check the notification in FirstViewController which is the default view controller. We need to add the following code in viewDidLoad method.
 NotificationCenter.default.addObserver(self,selector: #selector(SecondTypeNotification),
                         name: NSNotification.Name(rawValue: "SecondTypeNotification"),
                         object: nil)
 NotificationCenter.default.addObserver(self,selector:#selector(ThirdTypeNotification),
                         name: NSNotification.Name(rawValue: "ThirdTypeNotification"),
                         object: nil)
And also need two add the Notification observer function for adding actions to be executed with the same name used in Observer in FirstViewController.
 /// Action to be taken if push notification is opened and observer is called while app is in background or active
   @objc func SecondTypeNotification(notification: NSNotification){
     DispatchQueue.main.async
       {
         //Land on SecondViewController
         let storyboard = UIStoryboard(name: "Main", bundle: nil)
         let vc: SecondViewController = storyboard.instantiateViewController(withIdentifier: "SecondViewController") as! SecondViewController
         self.navigationController?.pushViewController(vc, animated: true)
       }
   }
   @objc func ThirdTypeNotification(notification: NSNotification){
     DispatchQueue.main.async
       {
         //Land on SecondViewController
         let storyboard = UIStoryboard(name: "Main", bundle: nil)
         let vc: ThirdViewController = storyboard.instantiateViewController(withIdentifier: "ThirdViewController") as! ThirdViewController
         self.navigationController?.pushViewController(vc, animated: true)
     }
   }
So whenever a notification is opened when app is in foreground or background the above will execute and move to respective view controller according to category in payload.
2. If your app is in inactive state -
This is the case where app is not opened or is terminated. So whenever the push notification arrives and user taps on push notification the first method which gets called is
 func application(_ application: UIApplication, didFinishLaunchingWithOptions launchOptions: [UIApplication.LaunchOptionsKey: Any]?) -> Bool {
     return true
   }
So we have to check in this function whether the app is launched by opening push notification or by clicking app icon. For this there is a provision provided to us. The function will look as follows after adding the required code.
 func application(_ application: UIApplication, didFinishLaunchingWithOptions launchOptions: [UIApplication.LaunchOptionsKey: Any]?) -> Bool {
     FirebaseApp.configure()
     if #available(iOS 10.0, *) {
       // For iOS 10 display notification (sent via APNS)
       UNUserNotificationCenter.current().delegate = self
       let authOptions: UNAuthorizationOptions = [.alert, .badge, .sound]
       UNUserNotificationCenter.current().requestAuthorization(
         options: authOptions,
         completionHandler: {_, _ in })
     } else {
       let settings: UIUserNotificationSettings =
         UIUserNotificationSettings(types: [.alert, .badge, .sound], categories: nil)
       application.registerUserNotificationSettings(settings)
     }
     // Register the notification categories.
     application.registerForRemoteNotifications()
     Messaging.messaging().delegate = self
     /// Check if the app is launched by opening push notification
     if launchOptions?[UIApplication.LaunchOptionsKey.remoteNotification] != nil {
       // Do your task here
       let dic = launchOptions?[UIApplication.LaunchOptionsKey.remoteNotification] as? NSDictionary
       let dic2 = dic?.value(forKey: "aps") as? NSDictionary
       let alert = dic2?.value(forKey: "alert") as? NSDictionary
       let category = dic2?.value(forKey: "category") as? String
       // We can add one more key name 'click_action' in payload while sending push notification and check category for indentifying the push notification type. 'category' is one of the seven built in key of payload for identifying type of notification and take actions accordingly
       if category == "Second"
       {
         /// Set the flag true for is app open from Notification and on root view controller check the flag condition to take action accordingly
         AppConstants.sharedInstance.userDefaults.set(true, forKey: AppConstants.sharedInstance.kisFromNotificationSecond)
       }
       else if category == "Third"
       {
        AppConstants.sharedInstance.userDefaults.set(true, forKey: AppConstants.sharedInstance.kisFromNotificationThird)
       }
     }
     return true
   }
Now will think what is that AppConstants. So before adding above code I have created one swift class named AppConstants to add the UserDefaults and declare the keys as follows:
 import Foundation
 class AppConstants: NSObject {
   let userDefaults = UserDefaults.standard
   static let sharedInstance = AppConstants()
   let kisFromNotificationSecond = "notificationS"
   let kisFromNotificationThird = "notificationT"
 }
So here I have defined two keys for two notification types which will store bool value. True if app is launched by opening push notification else by default it will be False.
So in above function in didFinishLaunching we are checking the app launched by user tapping on push notification or not. If yes then we check for the category of push notification and accordingly set the true value for keys in UserDefaults.
Further when app is launched first the main view will open so in FirstViewController we have to check in viewDidLoad, whether these UserDefaults value are true or false. And on that basis take action of pushing to respective view controller as follows:
 override func viewDidLoad() {
     super.viewDidLoad()
     // Do any additional setup after loading the view.
     // Add observer for the push notification posted on recieving in Notification center in AppDelegate file
     NotificationCenter.default.addObserver(self,selector: #selector(SecondTypeNotification),
                         name: NSNotification.Name(rawValue: "SecondTypeNotification"),
                         object: nil)
     NotificationCenter.default.addObserver(self,selector: #selector(ThirdTypeNotification),
                         name: NSNotification.Name(rawValue: "ThirdTypeNotification"),
                         object: nil)
     // Check the flag is true or not and if true set it to false again : push notification is opened while app is in inactive
     if AppConstants.sharedInstance.userDefaults.bool(forKey: AppConstants.sharedInstance.kisFromNotificationSecond) == true
     {
       //Land on SecondViewController
       let storyboard = UIStoryboard(name: "Main", bundle: nil)
       let vc: SecondViewController = storyboard.instantiateViewController(withIdentifier: "SecondViewController") as! SecondViewController
       self.navigationController?.pushViewController(vc, animated: true)
       AppConstants.sharedInstance.userDefaults.set(false, forKey: AppConstants.sharedInstance.kisFromNotificationSecond)
     }
     if AppConstants.sharedInstance.userDefaults.bool(forKey: AppConstants.sharedInstance.kisFromNotificationThird) == true
     {
       //Land on SecondViewController
       let storyboard = UIStoryboard(name: "Main", bundle: nil)
       let vc: ThirdViewController = storyboard.instantiateViewController(withIdentifier: "ThirdViewController") as! ThirdViewController
       self.navigationController?.pushViewController(vc, animated: true)
       AppConstants.sharedInstance.userDefaults.set(false, forKey: AppConstants.sharedInstance.kisFromNotificationThird)
     }
   }
Here in FirstViewControllers viewDidLoad method we have checked the bool value for those keys of user defaults and accordingly push to the particular view controller and set the bool value to false again. So now whenever a new notification arrives while app is in inactive state and user taps on push notification the above process takes place and user is moved to particular view controller.
Thats it for the topic. I hope you have got everything. Feel free to comment if I am wrong.
Thank you!!!otification arrives while app is in inactive state and user taps on push notification the above process takes place and user is moved to particular view controller.
Thats it for the topic. I hope you have got everything. Feel free to comment if I am wrong.
Thank you!!!
When APP is not active while touch the push notification ,it is not going to Notification page.
ReplyDelete1. my first view controller is Loading page. If Login success ,its go to Timer page. In timer page has skip button.If touch skip button ,its go to Home page.
so where i write the code (If your app is in inactive state )
Very Interesting blog. Keep posting more articles.
ReplyDeleteCheck out the following links for software services.
Digital marketing companies abu dhabi
Web Development Company
Mobile app development company
SEO company in Abu Dhabi
Creative Design Company
I did as you said. It works. So how can I pass the user information in the notification to other viewController?
ReplyDeleteNice Article you provide valuable content to us, keep it up. You’ve managed to make it readable and easy to read. You have some real writing talent.
ReplyDeleteFor Trusted Mobile App Development Company in Dubai visit: Mobile App Development Company in Dubai
Nice article and it’s really helpful content for us, keep sharing like this more informational article.
ReplyDeleteIf you a looking Leading Mobile App Development Company in Delhi NCR. Visit: Mobile App Development Company
Nice article and it’s really helpful content for us, keep sharing like this more informational article. If you a looking Leading Mobile App Development Company
ReplyDeletein Delhi NCR. Visit: Mobile App Development Company
Thank you for this valuable post it was very helpful. I really appreciate your effort. please keep us update.
ReplyDeleteIf you a looking Leading Mobile App Development Company in Delhi NCR. Visit: Top Mobile App Development Company